A detailed guide to using Adobe’s Camera RAW plugin to sucesfully develop your digital negatives.
Hello and welcome to another of tutorials I am writing about the RAW format.
So, you have your RAW images on your computer, but how do you edit them effectively while keeping them in the 16bit domain, since many of Photoshop’s functions are disabled at this level?
Getting a RAW Workflow plugin will make this a lot easier. Go to the Adobe website and select the one for your camera, this tutorial will be using the Nikon D70 Workflow, but controls in all of them are essentially the same.

(If you see .NEF, this is just the Nikon extension for RAW images :))
Because RAW images are completly unprocesseed by your camera, using the plugin gives you the ultimate control over your work.
So, Here is an outline of the basic tools you will encounter and use to edit your image:
The Histogram
I will not go over how to read histograms effectively again, please refer to my:
How To Read Histograms Tutorial.
This is, certainly one of, the most important tools you will encounter in your RAW Workflow environment – Learn to use it now, it will save you time later.

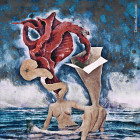
Generally – Try to keep an even spread with some higher peaks, and no extreme white or black. Maybe not the best example above :aww:
The White Balance & Tint
If you didn’t set the white balance on your camera, this is the time to do it. Colours can be ’repaired’ by moving the slider.
Note: Some cameras will give a coloured tint, probably green, when you do this. Use the Tint slider to edit that problem.

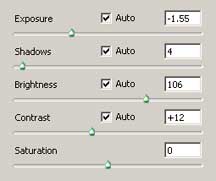
The Exposure
Fairly self-explained, Move it left to reduce exposure, move it right to increase it. Be warned, digital images do not pull or darken very well and you will get a magenta tint if you go too far!
The rest of the Adjust tab is obvious
The Sharpness, Luminance and Noise
Photoshop’s RAW sharpener is not the best, so use it with Unsharp Mask which is more controllable.
Don’t set this too high as you will get halos.
Luminance smoothing acts like Threshold in Unsharp Mask, use it lightly.
Noise reduction will reduce any noise in the shadow areas, and any created by the sharpening or Luminance smoothing.
If your camera was used at a low ISO, move the Luminance and Noise sliders to a low value. If you shot at a high ISO move them right.

Lens / Vignetting
Use this to add some subtle vignetts if desired.
Curve
Some RAW workflows do not feature this.
Use it like any other curves interface to enhance your image.

Calibrate
This can be used like a colour balance layer, so be subtle to achieve best results.

Output Options
Finally, the output options section.

Space – Adobe RGB 1998 is best for most images.
Depth – 8 or 16 Bit, Keep it at 16 for best results, or 8 for more editing compatibility with other editing tools.
Size – Pixel x Pixel Dimensions
Resolution – For prints, 240-300dpi. For Web, 72dpi or so.
That’s it folks. Hopefully you can use this rough guide along with your own photographs to get to grips with editing RAW images.
Thanks
~ Cof ~
About the author:
I live in Northern Ireland, currently still in school studying to do Sonic Arts at university. Enjoy photography (Nikon D70) and Photoshop (Cs), aswell as playing bass in jazz bands and singing choral/classical works. Check out my Profile/Gallery for more tutorials and to see my work.