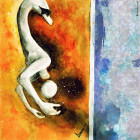
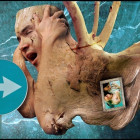
In this step-by-step walktrough tutorial we will show you how illustrator Anze Versnik uses the Photoshop/Illustrator workflow and creates his artwork called “Tac”. Exclusive to ArtCone.
Well here is the tutorial how I make my ilustrations. For all my work I am using two programs that I am combining together.These two programs are Adobe Illustrator CS and Adobe Photoshop CS. I am using my wacom graphire A5 sized tablet. So here we go…

Open a new file in Photoshop. With a wacom tablet I made a rough sketch of my creature that I am planning to draw using the pencil tool. Quite some time is spent on that step becouse the creature is kind of not existing in my head before I start drawing it but while I am drawing some ideas are popping into my head and I am trying to realize them. In this first step I’m drawing outlines in Photoshop by using the brush tool.

Once the primary sketches are made I export all outlines into Adobe Ilustrator CS. I put that outlines into one layer and then I draw vector outlines over primary sketch into a new layer. For that step I am using pen tool and for making outlines a little smoother I use pencil tool aswell. I must add that trough all of this stepst that I will write here in this tutorial the new ideas are showing. So here in this step I add the new style of eye and some other detailes on the body of that creature.

When all the outlines are finished I export them back to Photoshop on new layer. I deleted layers with the previous sketches. Then I do the coloring – firstly I put a new layer under the outlines and color the whole body as seems fit to me.

Then the shadows come up. I choose a little darker color and just color the parts where I think the shadows are lying.

After that is done I take the lasso tool and choose that part of picture where two different colors are together.

When this is marked I go to Filters/Blur and pick gaussian blur. And then I just play with that tool so it seems good to me.

For extra fixes and additions and for smoother gradiations between shadows I use the smudge tool and fix what is needed to be fixed.

After that a lot of work is done with the dodge and burn tool. With those two tools I make a higlights in the picture and fix up some shadows.
After all the coloring has been done I put a new layer under this creature and I work on the background the same way I am working on the creature. Here on this creature I planned not to do any background just some coloring and some shadows on the floor to make creature more three-dimensional and placed in some enviroment.
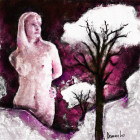
So I hope you have learned something with this tutorial of mine. Here is the final illustration, thanks for taking the time to read this tutorial.

About the author:
My name is Anze Versnik. I’m from Slovenia. I’m 20 years old and I am studying art pedagogics in Ljubljana which is the capitol city of Slovenia . At the moment i spend a lot of time working on my ilustrations. I am doing this for two years now. In my ilustrations you can find cute animal hybrid creatures usually colored with very intensive colors. I have developed my style of drawing ilustrations and trough time i hope that i will improve it. Enjoy
Tutorial © Anze Versnik aka vevrca | http://vevrca.deviantart.com
Published exclusively for ArtCone, redistribution without consent of the author is strictly prohibited.